Cheesecake is a dessert that has captured hearts and taste buds for generations. But have you ever thought about serving it in jars? Mini sweetened condensed milk cheesecake jars bring a fresh, fun twist to this classic dessert.
They’re not just cute; they’re also incredibly easy to make and perfect for any occasion. In this article, we’ll dive deep into the world of cheesecake jars, exploring their appeal, the best techniques, and why they could be your new go-to dessert.
The purpose of this article is to provide you with a comprehensive guide on mini sweetened condensed milk cheesecake jars. We’ll cover everything from ingredients to techniques to serving suggestions. So, let’s get started!
The Allure of Cheesecake Jars
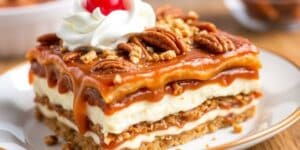
Cheesecake jars are more than just a trendy dessert. They offer a unique way to enjoy the rich, creamy goodness of cheesecake without the hassle of slicing and serving. Each jar is a perfectly portioned treat, making them ideal for gatherings or simply a night in. Plus, they’re visually stunning—layering the ingredients creates a beautiful presentation that’s sure to impress.
These jars are also versatile. You can customize them with various flavors, toppings, and crusts. The use of sweetened condensed milk adds an extra layer of creaminess and sweetness, making them irresistible. But what’s the secret behind their charm?
The Magic of Sweetened Condensed Milk
Sweetened condensed milk is a staple in many desserts, especially in no-bake recipes. It’s thick, creamy, and sweet, which makes it the perfect base for cheesecake. By incorporating it into your cheesecake mixture, you eliminate the need for additional sugar and heavy cream. This not only simplifies your recipe but also enhances the overall flavor.
Using sweetened condensed milk provides a luscious texture that’s hard to beat. It creates a smooth, velvety filling that pairs beautifully with the crunchy crust. In addition, it’s shelf-stable, which means you can keep it on hand for spontaneous dessert-making.
Ingredients You’ll Need
To make these delightful jars, you’ll need a few key ingredients. Here’s a basic list to get you started:
- Cream Cheese: This is the backbone of your cheesecake filling. Use full-fat for the creamiest texture.
- Sweetened Condensed Milk: This adds sweetness and creaminess.
- Vanilla Extract: Pure vanilla extract enhances the flavor.
- Lemon Juice: A splash of acidity balances the sweetness.
- Graham Cracker Crumbs: For the crust, providing that classic cheesecake base.
- Butter: To bind the crumbs together.
- Toppings: Fresh fruit, chocolate sauce, or caramel can elevate your jars.
Choosing Quality Ingredients
When it comes to cheesecake, quality matters. Opt for high-quality cream cheese and pure vanilla extract. These ingredients significantly impact the flavor and texture of your final product. Don’t skimp on the butter, either—using unsalted butter allows you to control the saltiness of your dessert.
Step-by-Step Guide to Making Cheesecake Jars
Now that we’ve got our ingredients, let’s dive into the process. Don’t worry; it’s easier than you think!
Step 1: Prepare the Crust
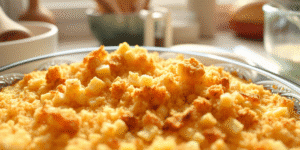
Start by crushing your graham crackers into fine crumbs. You can use a food processor or place them in a ziplock bag and crush them with a rolling pin. Once crushed, mix the crumbs with melted butter until they resemble wet sand.
Spoon the mixture into the bottom of your jars, pressing it down firmly. You want a solid base, so don’t be shy! Pop these into the fridge while you prepare the filling.
Step 2: Make the Cheesecake Filling
In a mixing bowl, combine the softened cream cheese and sweetened condensed milk. Use an electric mixer to blend until smooth and creamy. Scrape down the sides of the bowl to ensure everything is mixed well.
Add the vanilla extract and lemon juice. Beat again until fully incorporated. The mixture should be thick and velvety.
Step 3: Layer It Up
Remove the jars from the fridge. Spoon the cheesecake filling over the crust, filling each jar to about three-quarters full. You can use a piping bag for a neater presentation, or just a spoon works fine too.
Step 4: Chill
Cover your jars with lids or plastic wrap and place them in the refrigerator. Let them chill for at least two hours, but overnight is even better. This allows the flavors to meld and the cheesecake to set properly.
Step 5: Add Toppings
Just before serving, add your favorite toppings. Fresh berries, a drizzle of chocolate or caramel sauce, or even a sprinkle of nuts can elevate your jars. Get creative!
Common Questions and Misconceptions
You might be wondering about a few things. Let’s address some common questions.
Can I Make These Ahead of Time?
Absolutely! Cheesecake jars are perfect for meal prep. You can make them a few days in advance and store them in the fridge. Just add toppings right before serving to keep them fresh.
What If I Don’t Have Jars?
No jars? No problem! You can use small cups or even glasses. The key is to have clear containers so your beautiful layers are visible.
Are They Suitable for Gluten-Free Diets?
Yes! Simply substitute graham cracker crumbs with gluten-free options, like crushed nuts or gluten-free cookies.
Emerging Trends in Cheesecake Desserts

Cheesecake jars are part of a larger trend in dessert presentation. People are increasingly drawn to individual servings that offer a personalized touch. This trend reflects a growing preference for convenience and aesthetics, especially at gatherings and events.
Another exciting trend is the incorporation of unique flavors. Think matcha, lavender, or even savory options. These flavors can be infused into the cheesecake filling or used as toppings, allowing for endless creativity.
Expert Tips for Perfect Cheesecake Jars
As you embark on your cheesecake jar journey, keep these expert tips in mind.
- Room Temperature Ingredients: Always use room temperature cream cheese. This ensures a smoother batter with no lumps.
- Don’t Overmix: Overmixing can incorporate too much air, leading to cracks. Mix just until combined.
- Taste as You Go: Adjust sweetness and acidity according to your preference. A little extra lemon juice can brighten the flavor.
- Experiment with Layers: Consider adding fruit purees or chocolate ganache between layers for extra flavor.
Conclusion
Mini sweetened condensed milk cheesecake jars are a delightful way to enjoy a classic dessert. They’re easy to make, visually appealing, and perfect for any occasion. By using sweetened condensed milk, you simplify the process and enhance the flavor.
Remember, the sky’s the limit when it comes to customization. Experiment with different flavors and toppings to make these jars uniquely yours. So, gather your ingredients and start creating these delightful treats. Your friends and family will thank you!

Emily Rose Johnson is a talented writer known for her captivating storytelling and evocative prose, creating unforgettable characters and compelling narratives in various genres.