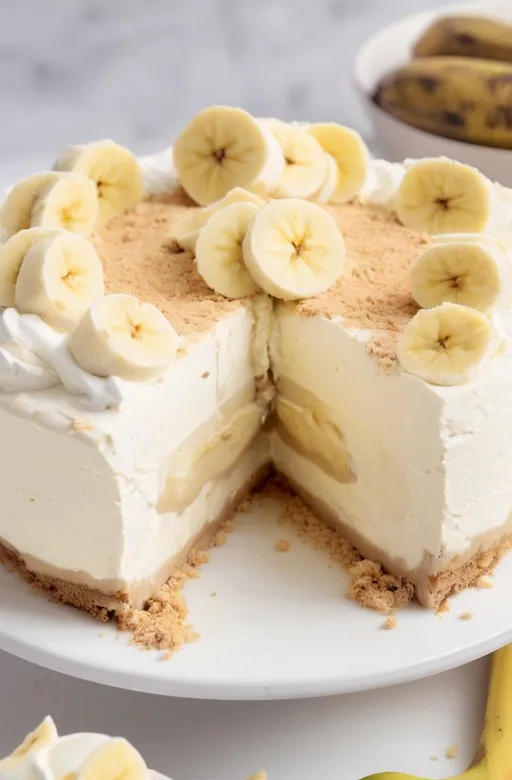
Banana pudding is a classic dessert that many people adore. It brings back childhood memories, evoking warm feelings of home and family gatherings. Now, imagine combining that nostalgic flavor with the creamy richness of cheesecake.
Sounds amazing, right? This article dives deep into the world of no-bake banana pudding cheesecake, providing an expert-level recipe, tips, and insights that will impress both novice and seasoned cooks alike.
Let’s explore the art of creating a no-bake banana pudding cheesecake that is not only delicious but also simple to make. By the end of this, you’ll be armed with all the knowledge you need to whip up this delightful dessert.
Understanding the Basics of No-Bake Cheesecake
No-bake cheesecakes are popular for a reason. They save time and effort, allowing the flavors to meld beautifully without the need for an oven. The base typically consists of cream cheese, sugar, and whipped cream, creating a light and airy texture.
Unlike traditional cheesecakes, which are baked, the no-bake version relies on chilling to set. This method is perfect for hot summer days when you want a refreshing dessert without heating up the kitchen.
Key Ingredients to Consider
When making a no-bake banana pudding cheesecake, the ingredients you choose are crucial. Here’s a breakdown of what you’ll need:
- Cream Cheese: This is the cornerstone of your cheesecake. Use full-fat cream cheese for the best flavor and texture.
- Heavy Whipping Cream: This adds lightness and a rich mouthfeel. Whipping it properly is essential.
- Bananas: Fresh, ripe bananas bring sweetness and natural flavor. Overripe bananas work best, as they’re softer and sweeter.
- Pudding Mix: Instant vanilla pudding mix is what gives the cheesecake that classic banana pudding taste. It thickens the mixture without cooking.
- Graham Cracker Crust: A buttery crust provides a nice crunch. You can make it from scratch or buy a pre-made one.
Equipment You’ll Need
Before you start, gather your tools. You’ll need a mixing bowl, electric mixer, spatula, and a springform pan. A springform pan is ideal for cheesecakes, as it allows for easy removal without damaging the dessert.
Step-by-Step Recipe for No-Bake Banana Pudding Cheesecake
Let’s get into the nitty-gritty of making this cheesecake. Follow these steps for a perfect result.
Ingredients
- 8 oz cream cheese, softened
- 1 cup heavy whipping cream
- 1 cup powdered sugar
- 1 package (3.4 oz) instant vanilla pudding mix
- 2 cups milk
- 3 ripe bananas, sliced
- 1 tsp vanilla extract
- 1 pre-made graham cracker crust (or homemade)
Instructions
- Prepare the Base: If you’re making your graham cracker crust, combine 1 ½ cups of crushed graham crackers with ½ cup melted butter and ¼ cup sugar. Press this mixture firmly into the bottom of your springform pan. Chill it in the fridge to set.
- Make the Cheesecake Filling: In a large mixing bowl, beat the softened cream cheese with an electric mixer until smooth. Gradually add the powdered sugar and vanilla extract. Mix until well incorporated.
- Whip the Cream: In another bowl, whip the heavy cream until stiff peaks form. Gently fold the whipped cream into the cream cheese mixture. This step is key for a light and airy texture.
- Add Pudding: In a separate bowl, whisk together the instant pudding mix and milk until thickened. Then, fold this into your cream cheese mixture. The pudding adds a beautiful flavor and helps the cheesecake set.
- Layer the Bananas: Slice the bananas and layer them on top of the graham cracker crust. Pour half of the cheesecake mixture over the bananas. Repeat with another layer of bananas and the remaining cheesecake filling.
- Chill: Cover the cheesecake with plastic wrap and refrigerate for at least 4 hours or overnight. This allows the flavors to blend and the cheesecake to set properly.
- Serve: Before serving, you can garnish with additional banana slices, whipped cream, or even a drizzle of caramel sauce for an extra touch.
Common Questions About No-Bake Cheesecake
Can I Use Other Flavors?
Absolutely! No-bake cheesecakes are versatile. You can experiment with different flavors like chocolate, strawberry, or even matcha. Just adjust the pudding mix accordingly.
How Long Can It Last?
A no-bake banana pudding cheesecake can last up to a week in the fridge, though it’s best enjoyed within the first few days. Just keep it covered to maintain freshness.
Can I Freeze It?
Yes, you can freeze it! However, the texture may change slightly upon thawing. Wrap it tightly in plastic wrap and then in aluminum foil to prevent freezer burn.
Expert Insights on No-Bake Cheesecake Trends

The trend of no-bake desserts is on the rise. Many people are looking for quick, easy recipes that deliver on taste without requiring extensive cooking skills. This cheesecake fits perfectly into that trend.
Health-conscious consumers are also leaning toward lighter desserts. By using ingredients like Greek yogurt instead of cream cheese, you can create a healthier version. Just be mindful that it may alter the texture slightly.
Addressing Misconceptions
One common misconception is that no-bake cheesecakes lack flavor. This couldn’t be further from the truth! The beauty of a no-bake cheesecake lies in its creamy texture and the ability to infuse it with various flavors. It’s all about balancing the ingredients correctly.
Conclusion
In conclusion, the no-bake banana pudding cheesecake is a delightful dessert that offers a wonderful blend of flavors and textures.
It’s easy to make and perfect for any occasion, from casual gatherings to special celebrations. With the right ingredients and a little bit of care, you can create a dessert that’s sure to impress.
Whether you’re a professional chef or a home cook, this recipe is a fantastic addition to your repertoire. Experiment with flavors, adjust ingredients, and most importantly, enjoy the process. Your taste buds will thank you!

Emily Rose Johnson is a talented writer known for her captivating storytelling and evocative prose, creating unforgettable characters and compelling narratives in various genres.